Posted in Baking Day, Recipes

Apple and Blackberry Pudding

Pudding.  There’s something about that word that conjures up comfort.  Something you’ll be hankering as Autumn envelops you bringing darker evenings, cooler air and while you sleep a sprinkling of frost may even be dusting your doorstep.  I can’t get enough of apple in desserts at this time of year; crumbles, tarts and yes oh yes please, pudding.  This would be epic after a long Sunday lunch or an evening of entertainment and something sure to send the recipients over that edge into blissful food coma.

Apple and blackberry pudding

There are some blackberry stragglers still clung to the hedgerows if you get a chance to look or you’ll find them with fruit in the supermarket and those cooking apples are still abundant and inexpensive.  The battery mixture of this almost forms a cake but with all the moistness of the fruit it will never dry into sponginess but will remain sumptuously soft and yielding.  As moist as it already is I do recommend that you take it to the next level and serve with some softly whipped fresh cream.
Apple and blackberry pudding

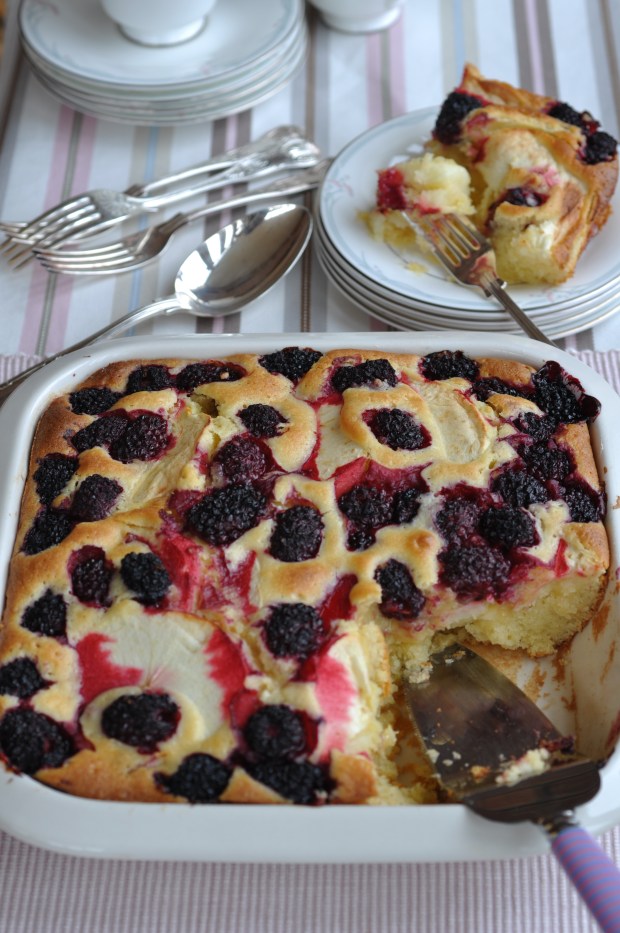
Apple and Blackberry Pudding : (Serves 9)

You will need:
175g unsalted butter
250ml carton whipping cream
225g caster sugar
3 eggs
400g cooking apples (2 large or 3 medium)
300g plain flour
300g blackberries
Butter to grease the dish
Method:
Preheat the oven to 180oC/Gas Mark 6 and grease a baking/pudding dish 25x25cm with butter.
Heat the butter and cream together in a saucepan and bring to the boil. Leave to cool a little.
Whisk the caster sugar and the eggs together for a few minutes until thick and set aside.
Prepare the fruit by coring, peeling and slicing the apples into rings, and washing the blackberries.
Add the butter and cream mixture to the eggs and sugar mixture, and whisk together.
Gently fold in the sifted flour to make a thick batter.
Pour the mixture into the baking dish and push in the apple rings.
Scatter the blackberries over the top and push some of them down into the batter.
Bake for 45–50 minutes and test the mixture with a skewer – if it comes away clean the cake is cooked.
Great served hot, straight from the oven, with some cream.

Enjoy! Sheila.

Posted in Baking Day, Recipes

Breakfast Muffins

Apple & Raisin Wholemeal Breakfast Muffins
Breakfast Muffin

Look at that.  You can see those chunks of apple peaking out at you can’t you?  Now is the time.  Autumn is here full of its ‘mellow fruitfulness’ and none so mellow as those wind-fallen apples currently waiting to be gathered – but hurry they won’t hang around for long! Cooking apples are at giveaway prices at the moment – I got 6 Irish Bramley Apples for 49c last weekend.  These muffins only needed two of those so I’ve plans to stew some others to put on top of porridge with cinnamon in the mornings – if you haven’t tried that it’s an unreal combination.  Dessert for breakfast.  Nothing like a little sweetness to wake you up and a little hit of warming spice.  If you can’t find ‘mixed-spice’ for these muffins you can just use cinnamon instead.  I do hope you get to try them.

tray of breakfast muffins
Breakfast muffins on wire tray
Makes 12 to 14
You will need:
350g extra coarse whole-wheat flour or any whole-wheat flour
2 tsp baking powder
1 tsp mixed spice
150g light brown sugar, plus extra for sprinkling ( or any type sugar)
Good handful of raisins
2 eggs, beaten
200ml natural yoghurt
4 tbsp sunflower oil
2 apples (bramley cooking apples is what i used, other eating apples like pink lady etc. work well too)
Method:
Preheat a fan oven to 160°C.
Line a 12-hole muffin tray with muffin cases.
Mix the flour, baking powder and mixed spice in a bowl, then add the brown sugar and the raisins.
Make a well in the centre and add the beaten eggs, natural yoghurt and sunflower oil.
Mix together with a wooden spoon until just combined.
Peel and core the apples, then cut into small cubes and stir them through the muffin mixture.
Spoon the batter into the cases, crumble a little extra brown sugar on top of each one and bake in the oven for 35 minutes, until golden. Allow to cool on a wire rack.
Enjoy! , Sheila

Posted in Baking Day, Recipes

Oreo, Lemon & Raspberry Cheesecake

Oreo, Lemon & Raspberry Cheesecake.
Double Strawberry & Oreo Cheesecake or Lemon Pick 3

Something to celebrate? This year has been ridiculously good in terms of things to celebrate for me personally. Speaking as a now wise woman who has just turned 50 I feel like I’m sage enough to dispense some advice. Celebrate everything. If you have two feet under you and the ability to walk, then celebrate. A sense of taste and smell that enables you to savour the pleasure that food can be, then celebrate. Fresh air. Freedom. Family. Friends. Health. Celebrate it all. In life some days, months and years will be better than others. There will be times of joy and times of sadness. There will be triumphs and there will be disappoinments. When the good things happen, celebrate. And what does that mean? It can be as simple as taking a minute to appreciate the moment, that leaf crunching underfoot in Autumn, that cricket chiming in the late evening warmth if you’re lucky enough to get away somewhere warm. Celebration doesn’t have to mean a party, you can celebrate with a smile.
& then there’s Cheesecake. Cheesecake is also a great way to celebrate!
Double Strawberry & Oreo Cheesecake or Lemon Pick 2

Double Strawberry & Oreo Cheesecake or Lemon Pick 1

Note: You’ll need a 20cm+ spring-form tin to make this cheesecake (the kind of tin that has a spring-release side and a removable base). If you don’t have one, just used a well-lined deep cake tin, but be warned that it will be very difficult to get the cheesecake out.

Another Note!: It is best to make the cheesecake the evening/day before for adequate setting time.

Final Note!: The strawberry version also pictured can be made by using strawberry jelly and strawberry syrup in place of lemon jelly and lemon juice and fresh strawberries instead of raspberries

You will need:
28 Oreo cookies (2 x 154g pack)
75g unsalted butter
135g packet raspberry jelly
100ml cold water
1 lemon
Handful of fresh raspberries
450g Philadelphia cream cheese (2 x 225g pack)
50g icing sugar
150ml cream
Fresh raspberries to decorate
Lemon zest to decorate

Method:
Preheat the fan oven to 160oC/Gas mark 4.
Put the oreo cookies in a plastic bag and crush into crumbs with a rolling pin or blitz in a mini chopper.
Melt the butter, combine with the cookie crumbs, and mix well.
Press the cookie mix into the cake tin (use a ‘spring-form’ cake tin that has sides that release to remove the base) and compact well together with the back of a spoon.
Bake in the oven for 10 minutes, take them out and leave to cool. Switch off the oven.
Make the jelly according to pack instructions – for me = put the jelly in a microwave proof jug with 100ml cold water and microwave for 1 minute. Mix well until fully dissolved.
Bring the level of the jelly up to 400ml in the jug by adding in the juice of the lemon and cold water.
Place the jelly in the fridge to semi-set for 1 hour.
When the jelly has been set for 1 hour use an electric mixer to cream the Philadelphia cheese and semi-set jelly together with 50g icing sugar until smooth.
Lightly whip 150ml of cream until just beginning to form peaks and then fold the cream and a handful of fresh raspberries into the cheesecake mix and pour over the cooled Oreo cookie base.
Leave to set for a few hours or ideally overnight.
Serve decorated with fresh raspberries, and lemon zest.
Enjoy! Sheila.

Posted in Baking Day, Dinner Party, Recipes

Chilli Con Carne

With three of my kids studying away from home this year I’m cooking with them in mind lately at home too.  This means that what I’m sharing on my Instagram feed may give them some ideas that are simple, tasty and easy should they take the figary to chop an onion.  Chilli Con Carne is one of those versatile dishes that can serve a party or a gaggle of students.  Usually served on rice I really find a baked potato to be a more satisfying vessel on which to prop the chilli.  And by the way if you don’t eat the skins of your baked potato you are really missing out on something special – load with some sour cream, some melting butter or better again melting cheese – delicious.  This recipe is one of the mainstays from my first book ‘Gimme the Recipe.’
Chilli con carne Pick 3

Ingredients – serves 6

You will need:
1 tbsp olive oil
500g round steak mince
2 medium onions
1 red pepper
2 garlic cloves
1 tsp hot chilli powder
1 tsp paprika
1 tsp cumin
2 tbsp tomato puree
1 tsp white sugar
1 tsp oregano
500ml beef stock
1 x 400g can chopped tomatoes
1 x 400g can kidney beans
Fresh parsley or chives to garnish
Baked potatoes or boiled rice to serve.
Method:
Heat the olive oil in a large deep frying pan or saucepan and brown the mince over a medium/high heat until the juices run clear.
While the mince is browning, finely chop the onions, dice the pepper into small pieces and crush the garlic.
Push the browned mince to the side of the pan, add the chopped onion and red pepper to the centre, and cook on a medium heat for 5 minutes.
Push the onion and pepper towards the sides, add the garlic, chilli powder, paprika and cumin, and cook for 1 minute.
Add the tomato puree, sugar, oregano, beef stock and canned tomatoes and mix well.
Bring to the boil then reduce the heat to a simmer for 20 minutes, stirring occasionally.
Strain, rinse and add the kidney beans and return to the boil.
Reduce heat again and simmer for 5 more minutes.
Great served with a baked potato and a dollop of sour cream with a garnish of chopped fresh parsley or chives.
Enjoy! Sheila


Posted in Baking Day, Christmas, Recipes

White Christmas Biscuit Cake- Recipe 12 of 12 from Enjoy!

White Christmas Biscuit Cake

Food photography Marta Miklinska, Food Styling by Jette Virdi (from cookbook Enjoy!)

Ta Dah! Recipe 12 of 12.  So I set myself the task of sharing 12 recipes from ‘Enjoy!’ over 12 weeks until Christmas and here we are!!!! It really does just sneak up in the end.  I love it.  I love the lights.  I love the buzz.  I love the frenzy in town and even the panicky feeling that you’ve forgotten something.  I did tweet during the week about something that bugs me though, the idea of the ‘PERFECT’ Christmas, that’s absurd.  We’re being sold perfection as something achievable and desirable and if it does exist then it would imply that there is just one version, the ‘perfect’ version of Christmas.  But Christmas is a unique experience to us all, the things that make us buzz, the movies that we want to watch, the rituals of gift-opening etc.. they vary in every household.  I’m wishing you all a unique and real Christmas.
In light of uniqueness here’s a recipe for a Biscuit Cake instead of traditional fruit Christmas Cake.  There’s still plenty of time and if you’ve kids they’ll love getting involved in the decoration.
Note:
A ‘springform tin’ is one used for cheesecakes that has a spring release on the side so that you can remove it easily.
White Christmas Biscuit Cake
You will need:
For the biscuit cake:
110g unsalted butter, softened
110g dark chocolate (at least 70% cocoa solids)
110g caster sugar
225g McVitie’s Rich Tea biscuits
Assortment of finger biscuits and sweets, to decorate
For the topping:
5 x 58g Mars bars
3 x 100g bars of white chocolate
Method:
Line a baking tray with non-stick baking paper . Place the ring of a springform tin on the paper – you aren’t using a cake tin, just the ring with the base removed to shape the cake.
Beat the butter until it’s smooth, then beat in the caster sugar.
In a separate bowl, break the biscuits into almond-sized pieces.
Melt the dark chocolate (I use the microwave) and gradually beat it into the butter mixture until smooth. Add the broken biscuits and stir well to cover with the cake mix.
Spoon the chocolate biscuit mix into the cake ring. Press it down and out to the sides with the back of the spoon until it’s even. Place the cake in the fridge to set overnight.
The next day, remove the cake ring from the set cake. Turn the biscuit cake upside down and place it on a wire rack – the bottom will be smoother, and it will now be the top. Put some parchment paper underneath the wire rack to catch the drips from the melted chocolate.
Cut the Mars bars into small pieces and melt them in a saucepan with a couple of tablespoons of water, mixing well to form a smooth topping. Pour the melted Mars bar topping onto the biscuit cake and chill it in the fridge for 1 hour. You can keep the piece of parchment paper to use it again for the next layer of melted chocolate.
Break the white chocolate bars into small pieces and melt them in a bowl in the microwave. Remove the cake from the fridge and set the rack back over the piece of parchment paper. Pour the melted white chocolate over the chilled biscuit cake, then carefully transfer the cake from the wire rack onto a cake stand or serving plate.
Have fun decorating with Christmas-themed sweets on top and white chocolate finger biscuits around the side.
Enjoy!
& Have a wonderfully unique Christmas!! Sheila.