Posted in Recipes, What's for Dinner Mom?

Jerk Chicken Drumsticks.

Being an Irish woman I just love potatoes.  What’s that got to do with Jerk Chicken you might ask? Well recently on twitter I started following this account called @TastyPotatoes and they are sharing the most delicious looking potato based dishes, dishes that scream ‘comfort’ and ‘eat me.’  One that I just had to try was their Jerk Potato & Black Bean Curry.  I reproduced it as best as I could using a can of black eye beans and chickpeas instead of two tins of black beans as they are simply not stocked in Irish supermarkets. as at time of writing I had never found them in an Irish supermarket.  Since writing the blogpost I’ve been told that black beans are available in SuperValu and indeed have verified this in my local branch.  For the Jerk Potato & Black Bean Curry Recipe just click on this link to Tasty Potatoes.

Dish of jerk potato and bean curry
Maybe I’m wrong on that score and If you know of any other  Irish supermarkets that sells them please let me know as that’s where I do most of my food shopping.
Black eye beans

Jerk seasoning was easily available in the supermarket and one that I hadn’t ever used before.
jamaican jerk seasoning
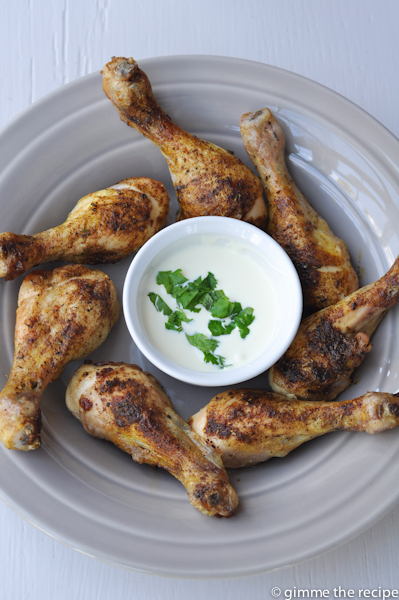
Not being of a vegetarian persuasion I chose to accompany the Jerk Potato & Black Bean Curry with Jerk Chicken Drumsticks.  Chicken drumsticks are under-utilised in cooking and recipes and thus incredibly cheap.
Jerk chicken drumsticks
close up jerk potato curry
Jerk Chicken and Potato Curry

Jerk Chicken Drumsticks
You will need:
Chicken Drumsticks
Rapeseed Oil
Jerk Seasoning
Sour cream & coriander to serve (optional)
Method:
Heat the oven to 200C
Place the chicken drumsticks on a baking tray, drizzle with oil, dust generously with jerk seasoning and cook in the hot oven for 20 to 30 minutes until golden in colour and cooked through.
Serve with sour cream & coriander.
Enjoy!
‘Til next time, Sheila

Posted in Baking Day, Recipes

Gluten Free Olive & Sundried Tomato Bread

A bag of Gluten Free flour got purchased by accident lately! Not one to waste anything I knew that gluten-free bread needs a bit of a helping hand to push it towards flavoursome and bready.  This recipe is based on one for ‘Olive Loaf’ in The hummingbird bakery ‘Home Sweet Home’ cookbook.  The Gluten Free flour that I used is called ‘Odlums Gluten Free Tritamyl White Bread Mix’.  It’s got too many ingredients for me to mention here but the main one I was looking for was a raising agent and it has that so I pressed on.
GF Olive and Sundried Tomato Loaf2
GF Olive and Sundried Tomato Loaf
GF Olive and Sundried Tomato Bread SlicedNice eaten with some Irish cheeses and relish, even more delicious toasted with some garlic butter on top.
You can view an Instagram video of the bread preparation here

Gluten Free Olive & Sundried Tomato Bread
You will need:
600g Odlums Gluten Free Tritamyl White Bread Mix
Half teaspoon garlic granules
Good grinding of salt and black pepper
80g green olives
50g sundried tomatoes
125ml sunflower oil
250ml milk
1 tbsp honey
2 eggs
Method:
Pre-heat a fan oven to 180C.
Prepare a 2lb loaf tin by greasing it with some oil and lining the base with a length of baking paper.
Chop the olives and sundried tomatoes.
Place the flour, garlic granules, salt and pepper in a large mixing bowl.
Use an electric mix to beat together the sunflower oil, milk, honey and eggs  in a separate bowl or jug (or you can whisk by hand).
Gradually add the wet ingredients into the dry ingredients bowl beating them together and then stir in the olives and sundried tomatoes.
Pour the bread mixture into the prepared tin.
Bake for 45 minutes until golden brown,  remove from oven and allow to cool in the tin for ten minutes or so, remove from tin and allow to cool completely before slicing.
Enjoy!
‘Til next time, Sheila

Posted in Recipes, What's for Dinner Mom?

Comfort & Mash

Comfort & Mash.

Have you turned on the heating yet? I have. We’re having thermostat difficulties but I’ll get over it. Every single year without fail I have heating problems. Last year we installed a new boiler (gas) and it has proved to be a lot more efficient than the previous beast with our bills are greatly reduced – though that might have something to do with the thermostat difficulties. Sigh.

So yes, comfort and all things mash are called for. One of my favourite vegetables to mash is parsnip, I love it with carrot or with apple and here I have it with some buttery softened leeks – delicious.

Parsnip & Leek Mash

Besides the chill factor there’s also the teen factor and this week has been particularly precarious – there are 6 of them aged from 13 to 18 – and to suffice it to say that this week we have been far from the Waltons. I watched a movie recently (so dreadful I can’t remember the name) that had one scene that struck a chord, a man contemplating imminent fatherhood asked his friend what parenthood was like and he replied that it was ‘Awful, awful, awful and then something happens that is so beyond amazing that you think yes, this is what it’s all for….. and then it reverts again to awful, awful, awful.’ Ok so it’s not that bad and I do remember the angst and frustration of being a teenager myself but there have been moments where parenthood has been just awful!

So besides heating you up internally I find that a bowl of delicious mash comforts and warms you up emotionally. A bowl of delicious mash is your friend.

Parsnip & Leek Mash:
You will need:
Butter
Leeks
Parsnip

Method:
Heat the butter in a frying pan over a medium heat and add the rinsed and finely chopped leeks to soften for around 5 minutes.
Meanwhile peel, chop and boil the parsnips in a saucepan of boiling water until tender enough to mash.
Drain the parsnips and mash with the buttery leeks and some more butter.
Season well with salt and pepper.
Serve on its own or as pictured with a side of pork chop, red onion gravy and a mashed potatoes.
Enjoy!
‘Til next time, Sheila
p.s. Voting continues for another couple of days for the Irish Food Blog Awards so a gentle reminder to VOTE FOR ME please! Just click here… vote for Gimme The Recipe to reach to Irish Blog Awards 2015 Finals

Posted in Dinner Party, Recipes

Party Food – Galia & Parma Bites

Putting together canapés, bites, appetisers, finger-food, call them what you will, can be an incredibly finicky and time-consuming affair.  For something that will disappear in one mouthful is it really worth putting a lot of hard labour into this effort? I don’t think so. Paring it back and keeping it simple means using first class ingredients and doing very little to them as they will sing for themselves.
Galia balls and scoop
Galia balls

Galia Parma Single Line
Galia and Parmer starter
Peppered Galia and Parma

Galia & Parma Bites:

You will need:
Galia Melon
Parma ham slices (prosciutto di parma or Jamón serrano)
(perhaps some chilli/garlic oil if the parma is dry)
Melon-baller
Cocktail sticks
Black Pepper

Method:
(this hardly warrants instruction as the pictures tell the tale)
Halve and deseed the Galia Melon and then use the melon-baller to create galia balls.
Push a gali ball onto the top of a cocktail stick and slide some parma up from the other end (I used a third to a half a slice for each one).
If you think the parma is a little dry use a pastry brush to lightly oil them with some flavoured oil.
Assemble and garnish with a dusting of cracked black pepper.
Enjoy.
‘Til next time, Sheila.

Posted in Recipes, What's for Dinner Mom?

Citrus CousCous

All in the name this is a very citrusy couscous.
Citrus CousCous
Both lemons and oranges are used for sweet and zingy goodness. I’m good for eating vegetables but fruit not so much.  There’s an awful lot of munching and crunching in chewing an apple so much so that it puts me off, I do love a fruit salad where everything is chopped into bite-size pieces and there’s plenty of berries involved and perhaps a dollop of cream.  All the better if it’s prepared by someone else.  Here the oranges used were easy peel satsumas and I used the zest and juice of the lemon.
Citrus CousCous 2

Citrus Couscous
You will need:
1 tbsp butter
250g couscous
250ml hot chicken stock
1 lemon
2 easy peel satsumas
1 small red onion
handful walnut pieces
handful rocket leaves
Method:
Melt the butter in a saucepan over a medium heat.  Add the couscous, stir well and cook for 2 minutes.
Remove the pan from the heat and pour in the stock, give a brief stir and then cover with a saucepan lid or clingfilm and leave to stand for 5 minutes.
Meanwhile prep. the other ingredients : zest and juice the lemon, peel and segment the satsumas, peel and slice the red onion.
Remove the lid and use a fork to fluff up the grains.
Add the zest and juice of the lemon, satsuma segments, onion slices and walnut pieces along with the rocket leaves and mix through.
Eat warm or cold.
Enjoy.
Til next time, Sheila.